Digital Accessibility: Scanned PDFs
Scanned PDFs are usually the least accessible PDF type. If you have these in the educational tools you share with learners it's time to get rid of them. In terms of screen readers, this type of PDF is as good as holding up a photograph and asking the tool to interpret it.
Many of us have Adobe Acrobat Pro installed on our university computers. If this is the case, we can use built-in tools to convert (the majority of) the scanned document into text. This can be up to 85% accurate, depending on the quality of the scan. The following are instructions form the Adobe Acrobat Website:
- Open a PDF file containing a scanned image in Acrobat for Mac or PC.
- Click on the “Edit PDF” tool in the right pane. Acrobat automatically applies optical character recognition (OCR) to your document and converts it to a fully editable copy of your PDF.
- Click the text element you wish to edit and start typing. New text matches the look of the original fonts in your scanned image.
- Choose “File” > “Save As” and type a new name for your editable document.
(usually Microsoft Word is the ideal tool to select)
In Earlier Versions of Acrobat Pro:
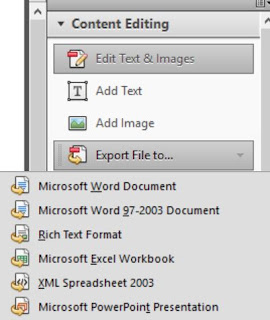

- Open the Scanned document
- Select Tools Drop-down toward the upper-right of the document window
- Select: Export File to... > Microsoft Word Document > Save
The resulting file will include both text characters and images (Acrobat converts things like logos, pictures, and indecipherable content into an image snip) that you can remove from the MS Word file.
You must now open the Word document that has been created and correct all errors before you share this with learners.
Up Next: Digital Accessibility, Saved as PDF > >
Up Next: Digital Accessibility, Saved as PDF > >