Posts

Showing posts with the label How-To

Digital Accessibility: MS PowerPoint Introduction (1)

Image
PowerPoint presentations tend to be highly visual, and people who are blind or have low vision can understand them more easily if you create your slides with accessibility in mind. Here are the main areas that we must be addressed: When creating a new slide, use the built-in slide designs. This ensures that slide contents can be read in the order that you intend. Include alternative text with all visuals Add meaningful hyperlink text and ScreenTips. Ensure that color is not the only means of conveying information Use the Accessibility Checker to find slides that have possible problems When you first start making slides accessible, it may seem like it takes a long time to "fix" everything. It does gets easier with practice - but it gets really easy when you build each slide using one of the built-in templates and the preset layouts. Templates provide the themes and color variants for your presentation. You'll want to choose those carefully while considering...

Digital Accessibility: MS Powerpoint Alt Text (2)

Image
Tip: To write a good alt text, make sure to convey the content and the purpose of the image in a concise and unambiguous manner. The alt text shouldn’t be longer than a short sentence or two—most of the time a few thoughtfully selected words will do. Do not repeat the surrounding textual content as alt text or use phrases referring to images, such as, "a graphic of" or "an image of." Add alt text to images PowerPoint does not automatically generate alt texts for drawn images, such as diagrams or icons. If you want to add an image that is an icon, screenshot, or other image that is not a photograph, you need to add the alt texts manually. Do one of the following: Option 1: Right-click an image and select Edit Alt Text Option 2: Select an image. Select Format > Alt Text The Alt Text pane opens on the right side of the slide. Type 1-2 sentences to describe the image and its context to someone who cannot see it. It is not necessary to say ...

Digital Accessibility - MS PowerPoint Links & Screen Tips (3)

Image
The following procedures describe how to make the hyperlinks, text, and tables in your PowerPoint presentations accessible. Add Hyperlink Text and ScreenTips Select the text to which you want to add the hyperlink, and then right-click. Select Link. The text you selected displays in the Text to display box. This is the hyperlink text. If necessary, change the hyperlink text. In the Address box, enter the description address for the hyperlink. Select the ScreenTip button and, in the ScreenTip text box, type a ScreenTip. Tip: If the title on the hyperlink's destination page gives an accurate summary of what’s on the page, use it for the hyperlink text. For example, this hyperlink text matches the title on the destination page: Templates and Themes for Office Online . You can Have some Fun with ScreenTips: Next Up: Digital Accessibility MS PowerPoint Color Contrast (4) > >

Digital Accessibility: MS PowerPoint Color Contrast (4)

Image
Make sure color is not your only method of conveying important information. In other words, do not use color alone to: convey meaning, make a distinction, make a comparison, or set something off or apart from the rest of the page.Use an accessible slide design Use one of the included accessible templates to make sure that your slide design, colors, contrast, and fonts are accessible for all audiences. They are also designed so that screen readers can more easily read the slide content. To find an accessible template, select File > New. In the Search for Online templates and themes text field, type accessible templates and press Enter. In the search results, select a suitable template. In the template preview window, select Create. High Contrast is best. The highest contrast and most easily visible for learners with or without color blindness is Black text on a white background. WebAIM has an online color checking tool. This web accessibility checker will detect a majori...

Digital Accessibility: Saved as PDF

Image
A more common type of PDF is one created in a different format and saved as a PDF. Perhaps you created a Microsoft Word handout and wanted to make it as available as possible to students. But to keep the formatting correct and not allow them to make any changes, you saved it as a PDF. The PDF is always less accessible than the original file. So, if you didn’t run the accessibility checker on your Word file and resolve any issues found then, the PDF will have those issues While PDFs are becoming easier to make accessible, the editing options are limited. My advice is that if you create the original file in another authoring tool (Word, PowerPoint, Etc) run accessibility checks in this tool and make your necessary changes there. It saves you quite a bit of work in Adobe Acrobat. that said, here's how to get the process started: Open the file in Acrobat Pro Click Tools Click Action Wizard Click Make Accessible After “making accessible,” Acrobat will want to run the ac...

Digital Accessibility: Scanned PDFs

Image
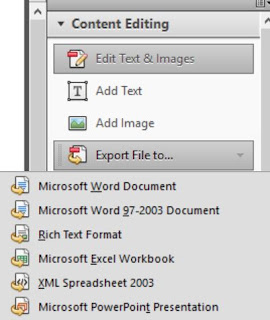
Scanned PDFs are usually the least accessible PDF type. If you have these in the educational tools you share with learners it's time to  get rid of them. In terms of screen readers, this type of PDF is as good as holding up a photograph and asking the tool to interpret it.  Many of us have Adobe Acrobat Pro installed on our university computers. If this is the case, we can use built-in tools to convert (the majority of) the scanned document into text. This can be up to 85% accurate, depending on the quality of the scan. The following are instructions form the Adobe Acrobat Website: Open a PDF file containing a scanned image in Acrobat for Mac or PC. Click on the “Edit PDF” tool in the right pane. Acrobat automatically applies optical character recognition (OCR) to your document and converts it to a fully editable copy of your PDF. Click the text element you wish to edit and start typing. New text matches the look of the original fonts in your scanned image. Choose “Fi...

MS Office Accessibility Checker

Image
Before sending your email message or sharing your document or spreadsheet, run the Accessibility Checker to make sure your Microsoft Office content is easy for people of all abilities to read and edit. Use the Accessibility Checker On the ribbon, select the  Review  tab. If you are using Outlook, note that you'll only see the  Review  tab  when writing or replying to messages. Select  Check Accessibility . Review your results. You'll see a list of errors, warnings, and tips with how-to-fix recommendations for each. See  Rules for the Accessibility Checker  for more information. Fix recommendations with ease To easily address accessibility errors and warnings, select an issue to open the  Recommended Actions  list. You can apply a one-click fix by selecting an action, or select the arrow button next to an action for more options.    Check accessibility while you work To be notified of accessib...

Digital Accessibility: MS Word Introduction (1)

Image
Microsoft Office gives you a convenient Accessibility Checker to help you create more accessible digital materials. When creating MS Word files for your students to access  (in print and electronically)  there are several accessibility guidelines that must be followed. These guidelines relate to six topics:  Styles   Structure   Data Tables   Clear-text Links   Alternative Text (i.e., alt text)   Color and Contrast Start with Styles Headings, Lists, and Emphasis   As we talk about different types of document authoring tools, there will be some things which keep coming up. So, it is best to talk about them when we're looking at Word. In Word, many of these formatting issues should be controlled through the Styles menu to help people who use assistive technologies to navigate content in a logical, sequential manner. Adjusting font size, color and formatting, such as using bold or underline, ...

Digital Accessibility: MS Word Lists & Emphasis (2)

Image
Using List Styles Any content that is organized as a list should be created using the list controls that are provided. There are usually one or more controls for adding lists. Using the available tools to create lists helps students using screen readers or assistive technologies understand how the content is organized. When a screen reader navigates a list, the screen reader informs the student that they’re on a list and informs them of how many items are in the list. Common List Mistakes A common mistake is to create your own “list” by typing in asterisks (*), dashes (-), or numbers before each line and pressing the tab key or space bar to move over.  MS Word, depending on the version you use will attempt to create a list for you at this point. Not using the list tool to properly format a list can make content more difficult to navigate by users of assistive technology. List Types For our purposes there are two types of lists that might be included in a document or w...

Digital Accessibility: MS Word Structure (3)

Image
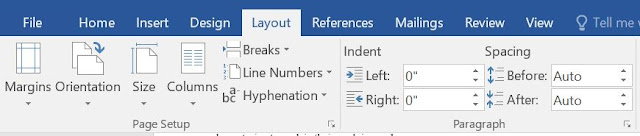
Structural Tips for Microsoft Word Headings and Lists provide the basis of good document structure. Layout, spacing, pagination, layout, and blank characters are also helpful structural considerations. Note: the the most frequent error in using the accessibility checker is four or more blank characters. This error occurs if someone hits the space, tab, or enter key more than three times. The solution is to use three or fewer blank spaces (tabs or hard returns). These often occur is because we use tabs or spaces to format our documents. There are ways to achieve certain looks which are accessible. Under the Home tab in your Word Ribbon, you have "Paragraph Tools" to help align columns of text and increase or decrease indentations. Under the "Layout Tab" you have several more options, such as: Columns Page and Line Breaks Increase and decrease indentation Using the built-in formatting tools make your finished product look more consistent w...

Digital Accessibility: MS Word Tables (4)

Image
Tables organize information visually and help you show relationships between things. Learn how to set up tables so they can be read out loud to people who use a screen reader. To add a header row to a table Choose Insert > Table to insert a table. Choose the number of boxes you want across to create columns, and then choose the number of boxes you want down to create rows for your table. Note: When you add a table to your document, two new tabs to appear in the ribbon: Design and Layout. These are the Table Tools. On the Design tab, choose the Table Styles Options group, and then choose Header row. Other options include Banded Rows or Total Row. Your table now has a header row. This means that, behind the scenes, Word and any assistive technologies can communicate intelligently about the table. Add column headings Place your cursor in the first cell on the top row of your new table. Type the name for this column and then press Tab to move from one column to th...

Digital Accessibility: MS Word Hyperlinks (5)

Image
A URL ( uniform resource locator) or web address is a location on the web, such as  www.ndm.edu/nursing . For a screen reader user, a URL is problematic as the screen reader attempts to read out the full address one letter at a time. On longer web addresses, a screen reader can lose or skip some of a URL as it attempts to read it. The way to fix this is to make a natural language hyperlink such as the  MSN News Page . Two Rules of Thumb: Don't show the actual URL, and Do not write "click here." Instructions for Adding Hyperlinks in Word To add a hyperlink to your Microsoft Word document, do the following: Type a meaningful title for your hyperlink. Select the title text. On the Insert tab, in the Links group, select Hyperlink to open the "Insert Hyperlink" dialog box. (Alternatively, you may right-click the selected text.) With the Link to: Existing File or Web Page option selected, insert the link's full URL into the Address bo...

Digital Accessibility: MS Word Color Contrast (6)

Image
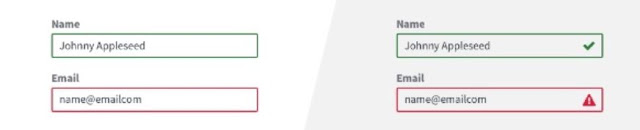
Make sure color is not your only method of conveying important information. In other words, do not use color alone to: convey meaning, make a distinction, make a comparison, or set something off or apart from the rest of the page. In the image above, the red field AND alert icon indicate an error to most people. To someone who has trouble distinguishing red on-screen, they can see the error because of the icon indicators in each field. If you categorize something by color alone, those who are color blind or blind will not benefit from the color distinction. Color Contrast Studies have shown that around 8% of men and 0.5% of women have color vision deficiency (CVD or color blindness). There are some colors which are not easily seen for individuals who have color blindness. Forms of color blindness include Protanopia (red),  Deuteranopia (green),  Tritanopia (blue), and  Monochromacy (no color). These individuals need sufficient color contrast to ...

Digital Accessibility: MS Word Image Text (7)

Image
Any images or graphics (pictures, illustrations, charts, tables, and graphs) that you place into a Word document can be made accessible by using these three elements: Position the figure "in line" with text. Add Alt Text - Alternate Text Include a caption 1. Make it In Line With Text Images that are floating, positioned behind, or in front of text will not be picked up by screen readers. You must make the image "in line" with your text. However, you do have some control over where your image is displayed. For instance, you can use left, right, or centered justifications to move the image, or set a tab stop to push it left to right. You can also align it using columns. 2. Adding Alt Text For images, illustrations, , follow these steps: Right click on the image > format the picture,  in the side panel which comes up there is a cross-shaped icon in which you can enter the alt text.   Enter the alt text in the DESCRIPTION field, not the title...

MS Word: Create A Table of Contents

Image
Follow these steps to insert a table of contents: Click in your document where you want to create the table of contents. If you'd like it to appear on its own page, insert a page break (Ctrl+Enter) before and after inserting the ToC. Click the References tab. ... Choose the style of Table of Contents you wish to insert.