Posts

MS Office Accessibility Checker

Image
Before sending your email message or sharing your document or spreadsheet, run the Accessibility Checker to make sure your Microsoft Office content is easy for people of all abilities to read and edit. Use the Accessibility Checker On the ribbon, select the  Review  tab. If you are using Outlook, note that you'll only see the  Review  tab  when writing or replying to messages. Select  Check Accessibility . Review your results. You'll see a list of errors, warnings, and tips with how-to-fix recommendations for each. See  Rules for the Accessibility Checker  for more information. Fix recommendations with ease To easily address accessibility errors and warnings, select an issue to open the  Recommended Actions  list. You can apply a one-click fix by selecting an action, or select the arrow button next to an action for more options.    Check accessibility while you work To be notified of accessib...

Digital Accessibility: Screen Readers

Image
When creating more accessible documents, PDFs, and presentations for online distribution, we aim to make these accessible for all learners; including those who use screen readers. Have you ever experienced a screen reader? The Microsoft Immersive Reader is accessed using our webmail (Microsoft Outlook online email). It appears when you open a document that's attached in an email message (no available for PDFs). Works for OneNote, and other MS tools...it is also built-in to FlipGrid video discussion tool.

Digital Accessibility: MS Word Introduction (1)

Image
Microsoft Office gives you a convenient Accessibility Checker to help you create more accessible digital materials. When creating MS Word files for your students to access  (in print and electronically)  there are several accessibility guidelines that must be followed. These guidelines relate to six topics:  Styles   Structure   Data Tables   Clear-text Links   Alternative Text (i.e., alt text)   Color and Contrast Start with Styles Headings, Lists, and Emphasis   As we talk about different types of document authoring tools, there will be some things which keep coming up. So, it is best to talk about them when we're looking at Word. In Word, many of these formatting issues should be controlled through the Styles menu to help people who use assistive technologies to navigate content in a logical, sequential manner. Adjusting font size, color and formatting, such as using bold or underline, ...

Digital Accessibility: MS Word Lists & Emphasis (2)

Image
Using List Styles Any content that is organized as a list should be created using the list controls that are provided. There are usually one or more controls for adding lists. Using the available tools to create lists helps students using screen readers or assistive technologies understand how the content is organized. When a screen reader navigates a list, the screen reader informs the student that they’re on a list and informs them of how many items are in the list. Common List Mistakes A common mistake is to create your own “list” by typing in asterisks (*), dashes (-), or numbers before each line and pressing the tab key or space bar to move over.  MS Word, depending on the version you use will attempt to create a list for you at this point. Not using the list tool to properly format a list can make content more difficult to navigate by users of assistive technology. List Types For our purposes there are two types of lists that might be included in a document or w...

Digital Accessibility: MS Word Structure (3)

Image
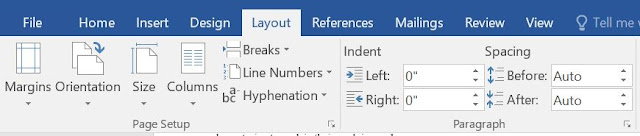
Structural Tips for Microsoft Word Headings and Lists provide the basis of good document structure. Layout, spacing, pagination, layout, and blank characters are also helpful structural considerations. Note: the the most frequent error in using the accessibility checker is four or more blank characters. This error occurs if someone hits the space, tab, or enter key more than three times. The solution is to use three or fewer blank spaces (tabs or hard returns). These often occur is because we use tabs or spaces to format our documents. There are ways to achieve certain looks which are accessible. Under the Home tab in your Word Ribbon, you have "Paragraph Tools" to help align columns of text and increase or decrease indentations. Under the "Layout Tab" you have several more options, such as: Columns Page and Line Breaks Increase and decrease indentation Using the built-in formatting tools make your finished product look more consistent w...

Digital Accessibility: MS Word Tables (4)

Image
Tables organize information visually and help you show relationships between things. Learn how to set up tables so they can be read out loud to people who use a screen reader. To add a header row to a table Choose Insert > Table to insert a table. Choose the number of boxes you want across to create columns, and then choose the number of boxes you want down to create rows for your table. Note: When you add a table to your document, two new tabs to appear in the ribbon: Design and Layout. These are the Table Tools. On the Design tab, choose the Table Styles Options group, and then choose Header row. Other options include Banded Rows or Total Row. Your table now has a header row. This means that, behind the scenes, Word and any assistive technologies can communicate intelligently about the table. Add column headings Place your cursor in the first cell on the top row of your new table. Type the name for this column and then press Tab to move from one column to th...

Digital Accessibility: MS Word Hyperlinks (5)

Image
A URL ( uniform resource locator) or web address is a location on the web, such as  www.ndm.edu/nursing . For a screen reader user, a URL is problematic as the screen reader attempts to read out the full address one letter at a time. On longer web addresses, a screen reader can lose or skip some of a URL as it attempts to read it. The way to fix this is to make a natural language hyperlink such as the  MSN News Page . Two Rules of Thumb: Don't show the actual URL, and Do not write "click here." Instructions for Adding Hyperlinks in Word To add a hyperlink to your Microsoft Word document, do the following: Type a meaningful title for your hyperlink. Select the title text. On the Insert tab, in the Links group, select Hyperlink to open the "Insert Hyperlink" dialog box. (Alternatively, you may right-click the selected text.) With the Link to: Existing File or Web Page option selected, insert the link's full URL into the Address bo...